
Article Objective: To assist admin users in navigating the Admin Centre within Active Ledger & Reporting to customise the firms reporting styles. Context: Report styles let you customise the look and feel of your reports by changing items such as colours, fonts, sizes and margins. By default all styles are inherited from those managed by Business Fitness, however this area allows you to customise them as you see fit. Please refer to the Glossary for definitions of key terms used in this article. TABLE OF CONTENTS |
Accessing the Admin Centre
Navigate to the Active Platform home page.

Click on your name icon and press Admin Centre.

Click on Ledger & Reporting Admin.

Click on Report Styles.

Adding report styles
The below screen will appear. To add a report style, click + New Style.

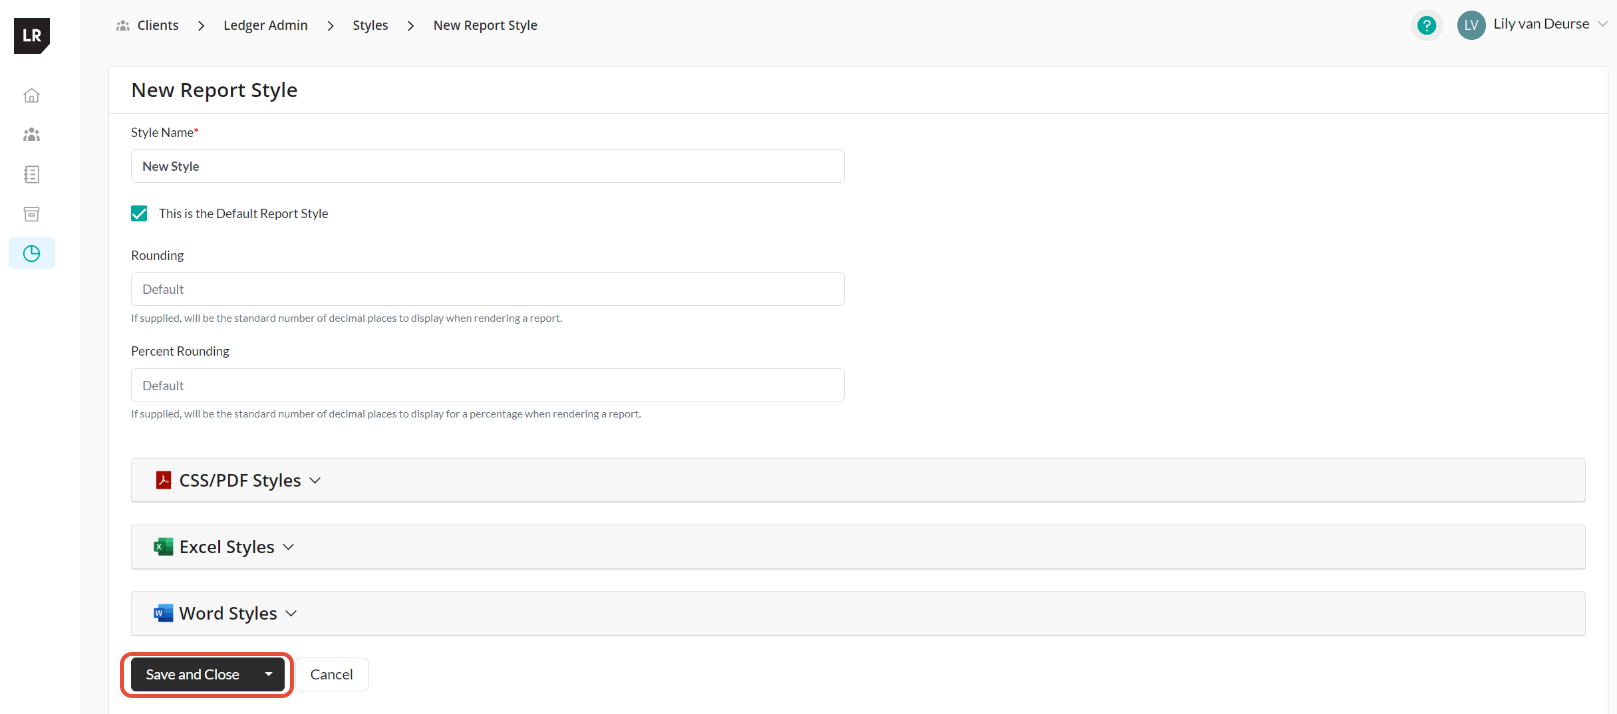
The following screen will appear, showing the fields which are common to all report formats.

The fields are as follows:
Field | Description | Validation |
| Style Name | A name to help you identify the style. | Required |
| This is the Default Report Style (checkbox) | If checked, all reports will use this style by default (instead of the Business Fitness standard styles), unless another style is specifically selected. You can only have one default report style. | Optional |
| Rounding | Sets the rounding to use for all dollar and number based amounts. Number from 0 to 5. | Optional |
| Percent Rounding | Sets the rounding to use for all percentage amounts. Number from 0 to 5. | Optional |
| Style | 1. CSS / PDF - Web based reports use a language called Cascading Style Sheets (CSS) to define styles. This language is used to display both reports rendered in the web application, as well as the PDF version of reports 2. Excel - reports can optionally be exported in Excel, in which case the Excel style options are used 3. Word - reports can optionally be exported in Word, in which case the Word style options are used. When you build a custom style, you can choose to customise just one of the styles or a combination of all three. Refer to section in the article below for more information on how to do this. | Optional |
Customising formatting styles
To customise the areas you wish, select the Customise checkbox on your desired style.

1. CSS/PDF styles
Fonts
You can add custom google fonts to a report. First, find your font on https://fonts.google.com/. Select Get font.

Select Get embed code.

From here, copy the link with the 'href' tag. For example, the following selected font for Montserrat shows:

In Active Ledger, under the Font Urls section of the CSS/PDF Styles option, paste the link for the font in the Url box. The available fields are:
Field | Description | Validation |
| Name | To help you identify the font to which the URL refers to. | Required |
| Url | The URL of the font, with no quotation marks. This must be a valid web URL from fonts.googleapis.com. | Required |
For our example font, you would enter the following and click + Add Font.

Once the font is added, you will be able to add the 'font-family' style to any element in the 'Edit Element' section.
There are a myriad of options to choose from here but as an example, you could select to edit the Entire Report element and add the above font-family.

Once the element is selected, the CSS Properties will need to be entered. The font-family description can be obtained from the google fonts embed font window described above. Copy the description and paste into the font-family box in Active Ledger.


It is also possible to upload your own font. Begin by clicking on the upload icon. You will then have the option to choose your own ttf file by clicking on the Choose File button.


Once uploaded, give the font a name and click on the + button to add it. The font can now be used for all font-family elements by using the name in quotation marks (i.e. 'Automali').


Custom styles
CSS styles apply to report elements. Select the name of an element in the 'Edit Element' dropdown to customise that element.
When you first view the element, you will see all the properties that are currently used by the Business Fitness default styles. For example, the Header element looks like this:

The current default values are shown in faded grey. Type in a new value to customise it to your preference. You can use a site such as https://cssvalues.com/ to see available values for each property.
You can add additional properties by selecting them from the dropdown list under 'Select new property to add'.

Some elements have properties that will be inherited by other elements. For example the Headers element applies to all other headers, for example Header Level 1, Header Level 2, etc..
The Entire Report element contains styles that are used as base values for the entire report.
Preview
At any point, you can click the Preview Report button to see a sample web-based report rendered with your custom styles.

2. Excel styles
Excel reports are styled by using the styles feature in Excel. We recommend using our master template as a starting point. Click on the Report Template hyperlink to download a copy.

The base template is made up of a primary 'Template' sheet which acts as a basis for all pages produced by the Excel report writer. The 'Template' sheet is blank and acts as the page layout guide. Here you can modify the following properties:
Option | How |
| Column widths | Change the width of any of the standard columns to your preferred width. Note: If this changes the number of standard columns that fit on a portrait or landscape page, update the 'No of Columns (Portrait)' and 'No of Columns (Landscape)' properties in the 'Excel Rendering Options' area of the Report Style window (see 'Rendering options' section in this article for more information). |
| Default row height | Select any of the columns (clicking on the columns letter) and update the font and font-size in order to change the default minimum row height. |
| Header and footer | Add a header/footer to this page for it to appear on all pages of the report. To do this, navigate to the Insert ribbon and select Header & Footer. Scroll to the footer and type in the text placeholder {{Footer}} (including the two curly braces) into any section within the footer where you want the report-generated footer text to be inserted. |
In addition to these properties, you can change the style of the Every Report element by working with the Excel 'Cell Styles' menu (located on the Home ribbon in Excel).

A sheet called 'Rep_Styles' contains a handy reference to these styles.
WARNING: DO NOT change the formatting in this sheet directly.
Instead, click on an element that you wish to edit and you will find it highlights the relevant style in the Cell Styles dropdown. You can then right-click on the style and select Modify.

Make any required changes (font, colour, size, etc) and click OK. The style change will be reflected in the 'Rep_Styles' sheet.

Number formats
There are a series of report number formats that can also be edited in the 'Rep_Styles' sheet. These differ from normal styles in that only the number formats are used within the style definition. Leave the default rounding (the global 'rounding' property of the report style set at the beginning of this document will override this), but you can change the appearance and formatting for positive amounts, negative amounts, and zero amounts.

Once all changes have been made in the report template, return to Active Ledger and upload the file.

Rendering options
In addition to the Excel template, a number of rendering options are used to change the way the Excel report writer works. Detailed descriptions are included in the form per the screenshot below:

3. Word styles
Word reports are styled by using the styles feature in Word. We recommend using our master template as a starting point. Click on the Report Template hyperlink to download a copy.

You can change the style of the Every Report element by working with the Word 'Cell Styles' menu (located on the Home ribbon in Word).
WARNING: DO NOT change the formatting in this sheet directly.
Instead, click on an element that you wish to edit and you will find it highlights the relevant style in the Cell Styles dropdown. You can then right-click on the style and select Modify.

Make any required changes (font, colour, size, etc) and click OK. The style change will be reflected in the document.

Once all changes have been made in the report template, return to Active Ledger and upload the file.

Rendering options
In addition to the Word template, a number of rendering options are used to change the way the Word report writer works. Detailed descriptions are included in the form per the screenshot below:

Finalising the report style
To finalise the new style, select Save and Close.
You will then see a complete list of your styles. From here you can see whether the CSS/PDF, Excel and/or Word style has been customised and whether one of your styles has been set as the default style for all reports.
To edit or delete a style just click on it and make the relevant changes.

Using styles
If you have selected the 'This is the Default Report Style' checkbox, then this style will automatically be used for all reports.

If you have more than one style or don't have a default report style, then you can choose a style on a report-by-report basis by selecting it from the 'Style' dropdown menu when creating a report master.
For more information on how to do this, see the knowledge article: Reporting - report masters.
